Tuesday, March 25, 2014

Randy Cunningham's Ninja (ART TRADE)

So this is my piece for an art trade with Laura Murray (http://lauramurray22.blogspot.ie/)


I drew the character she designed along with the ninja from Randy Cunningham (love him).


Beneath is the character she designed for me


Below is the process as usual:

1 & 2: Thumbnail sketch and clean up ( was going to paint this, so the lines didn't have the be great)


3) Flats


4) The painful painting process...arrghhh :D
I didn't take screens here, I actually paint on 2 layers only, background and foreground.


Monday, March 24, 2014

Randy Cunningham Scenes

I saved the scenes I worked on for both episodes of season 1 to my youtube account. It's not that I'll be using it for a showreel, but I want to be able to look back through my work and see the progress. I can only hope that I get more work after my contract ends, otherwise this will be a memory of a short lived animation career ;)

These are scenes from Episode 49, which was the first episode I worked on. Props to the BG and Comp department for really bringing this to life!


The following sequence is from episode 52 (the season finale), which is actually less good than my first episode :P One of the reasons is that the original ninja & Plop Plop were new characters, so there was not a lot of reference to go by. Was also the first time animating the ninja for me (little did I know he would be my favorite character to work on later :D). I didn't really have the confidence to push things further at the time. This sequence was a full minute of animation done in 3 weeks. So I am actually just really glad I managed to finish it all in time!

Sunday, March 23, 2014

ART TRADE with Michelle Henderson : Final Fantasy XII's Vaan

This is my piece for an art trade with Michelle Henderson. Please check out her work on her  facebook page. If you like character design, you'll love her artwork!

I'm not exactly sure if I like my own piece, I really want to work on perspective and dynamic poses...but I am still very "fresh" in doing that. So most likely I am greeted with failure...but I don't have the skills yet to see. I like the composition and color palette however.

I posted a step by step below.

MY ARTWORK:


MICHELLE's ARTWORK (click to enlarge)
(https://www.facebook.com/tenguarts)


STEP BY STEP:

1) Thumbnail/ ROUGH
2) ROUGH PENCILS
As you can see I was making a lot of changes through the process. I cut and pasted the arm to make it bigger, and in the ink version I also enlarged the leg.

3) INK (sort of..it's more like clean pencils)


4) Color FLATS


5) Color Shading (simple)

After that I changed the colors slightly (Just changed the heu and contrast) and changed his facial expression into something more normal :D


Michelle then helped me out with easy fix...OVERLAP!


Sunday, March 16, 2014

DBZ, Little Witch Academia & Kill La Kill Sequence studies

I was experimenting in a new sketchbook with watercolor, posterpaint, watercolor pencils and Gouache. Trying to find a media that can quickly give my sketches some life. I experimented further by doing some studies of movement on my other blog. --> LINK


This is a sequence of Trunks in a DBZ episode.

I recently saw an AMAZING documentary of a short film called Little Witch Academia by Trigger. I highly recommend you watch it if you are into animation. --> LINK

I also wanted to at least show my appreciation to the animators by watching the actual short as well :D I have to say that initially it looked like something I wouldn't watch, but I really ended up enjoying it..especially the animation and draughtsmanship is outstanding. Below are some sketches of a couple of poses while trying out some different media to give it a lick of quick color.


I then switched to watching a few episodes of Kill La Kill by the same studio. I was totally amazed by the VERY STRONG POSING and EXCELLENT SHOT LAYOUTS. It's quite incredible and I highly recommend it just for that. The story itself could be a bit offensive, since you get arse and tits shoved into your face every other second.


Saturday, March 15, 2014

SETTING GOALS

This is my plan for the next unforeseeable future! Putting it out here so it is official. Would be nice to look back in x amount of years and hopefully see that I stayed committed and succeeded.


Dragon Ball Z: Sequence Study

This is a study of a scene I liked, there are lots of close and panaromic shots which make it very dymanic. Also interesting to see the how often frames are held for longer than even 3 frames, because you'd normally assume that action is done on ones. That's why I'm looking at this show at the moment, because a lot of the techniques used nowadays were invented back in the days. Going to the roots to learn! :)


Monday, March 10, 2014

DBZ Android 18 Sketch 2 + Step by Step

This time I will only link to the reference material I used as it takes too much effort to include it here on the blog :D

Anyway, this sketch was based on an image from pinterest (LINK), and the outfit + color reference from LINK.


1) Rough Sketch


2) Tight Sketch

3) Clean up

4) Colors

Sunday, March 9, 2014

Dragon Ball's Android 18 Sketch + Step by Step

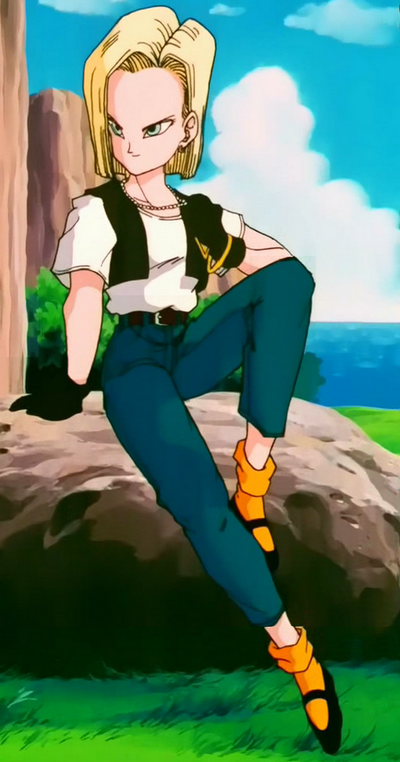
Mel MIltopn advises to use reference, and it really makes sense. Not only will your sketches be better, but you will be adding new poses and ideas into that library of yours! So this is the first of hopefully a series of many to come. I started with one of my favorite characters from DBZ, Android 18! This image took me a bit less than an hour to complete from start to finish.


So first of all I gathered the reference I needed.
1) Clothing and design ref from the wiki

(http://static2.wikia.nocookie.net/__cb20130704202016/dragonball/it/images/e/eb/C-18.png)

2) Pose based on a drawing from the book Anime & Game Characters vol 4 :


3) I looked for an image I liked so I could try and replicate the style, in this case I picked the same colors. The original image is from (http://dribbble.com/shots/1230662-Android-18/attachments/165879) I believe the artist name is Jisoo Kim. LOVE THE IMAGE! :D


The process starts with a sketch, since the reference I was using was male I had to adjust the figure to a more female shape:


Tight Sketch on a second layer with clothes:

Clean up sketch on yet another layer:

I then did the flats based on the colors from the image I references above:


Applied some "color doge" on the edges as that is what the original artist might have done, I then added some extra shadow and the  pattern on the arms:


Finally Applied another layer on overlay to get an effect of light pouring in at some of the corners. Of course I really rushed through all those steps and I personally think it looked better at the color flats stage but it's fun to experiment!


Thursday, March 6, 2014

Sketch based on a sketch

Started doing this for a while, but I use sketches of people to inspire a digital sketch. Tried to do some digi painting, it's been a while and I remember why I don't do it...because I don't know anything about color or values :D


And to cap off the evening a sketch without reference: